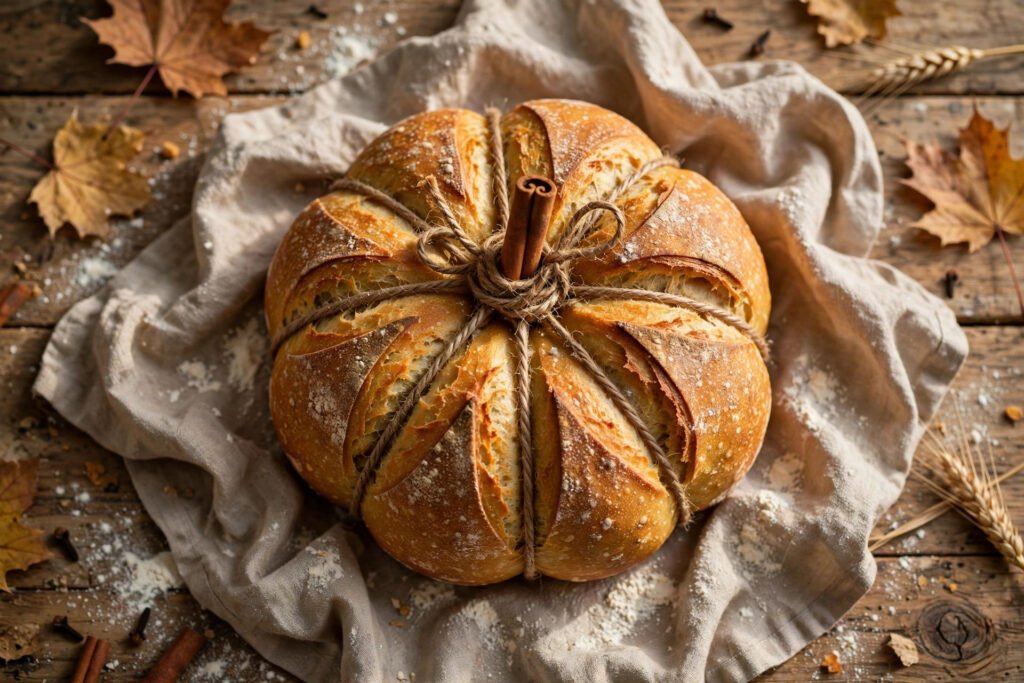
Tie a round loaf with kitchen twine before it bakes and it comes out of the Dutch oven looking like a pumpkin. That is the whole trick, and it is a good one: the dough is a soft pumpkin sourdough with a golden crumb, and the shape does the decorating for you. No special pan, no food coloring, nothing you don’t already own.
This is the loaf to put in the middle of a fall table. It also happens to be the best way to learn how much shaping matters, because pumpkin puree makes dough softer than a plain loaf, and soft dough tells on you. Get the fermentation and the tying right and it holds its ridges all the way through the bake.
Why pumpkin changes the dough
Pumpkin puree is about 90% water, so it counts as hydration even though it looks like a solid. This formula runs at roughly 75% total hydration once you count the puree, which is why the water in the bowl looks low. The puree also brings sugar and fiber: the crumb bakes soft and slightly sweet, the crust colors faster, and the dough ferments a touch quicker than a plain loaf at the same temperature. Plan for that in the schedule below.
One honest note on flavor: this tastes like good sourdough with a gentle pumpkin warmth, not like pumpkin pie. The cinnamon is optional and kept low on purpose. If you want it to read as a spiced loaf, use the full teaspoon.
The formula
Baker’s percentages are against the flour, as always.
| Ingredient | Amount | Baker’s % |
|---|---|---|
| Bread flour | 500 g | 100% |
| Pumpkin puree (plain, not pie filling) | 225 g | 45% |
| Water, lukewarm | 175 g | 35% |
| Active sourdough starter, at peak | 100 g | 20% |
| Fine sea salt | 10 g | 2% |
| Maple syrup or honey (optional, helps color) | 15 g | 3% |
| Ground cinnamon (optional) | ½–1 tsp | — |
You will also need: 4 pieces of baker’s twine, each about 60 cm (24 in), a little neutral oil for the twine, and a cinnamon stick or a pecan half for the stem.
Yield: 1 loaf, about 1 kg of dough. Fits a 4–5 quart Dutch oven.
Two schedules
Weekend schedule (bake day): Feed the starter in the morning. Mix early afternoon, bulk ferment through the afternoon, shape and tie, cold proof overnight, bake the next morning. Best shape and flavor.
After-work schedule: Feed the starter before work. Mix at 6 pm, bulk ferment until about 10 pm (a warm kitchen helps), shape, tie, and refrigerate. Bake the next evening straight from the fridge, any time up to 24 hours later. The cold loaf actually holds its ridges better, so this is not the lesser option.
Method
1. Mix and rest (30 minutes)
Whisk the water, pumpkin puree, starter, and maple syrup together in a large bowl until the starter dissolves. Add the flour, salt, and cinnamon. Mix until no dry flour remains. The dough will look shaggy and feel sticky. That is correct. Cover and rest 30 minutes.
2. Bulk ferment (3½–5 hours at about 24°C / 75°F)
Give the dough 4 sets of stretch-and-folds in the first 2 hours: wet one hand, pull one side up and over, rotate the bowl, repeat 4 times per set. Pumpkin dough starts slack and builds strength slowly, so don’t skip sets. By the last set it should feel smooth and elastic.
Bulk is done when the dough has risen about 50–75%, looks domed, and jiggles when you shake the bowl. At 21°C (70°F) expect closer to 5 hours; at 26°C (79°F), closer to 3½. Pumpkin dough over-proofs quietly, so err on the early side: a slightly under-proofed loaf keeps its shape, an over-proofed one melts into a pumpkin puddle.
3. Shape and tie
Shape the dough into a tight round boule on a lightly floured surface, building as much surface tension as you can without tearing it. Rest it seam-side down for 10 minutes.
Soak the 4 pieces of twine in a little oil (this is what lets you remove them cleanly later). Lay them across each other like the spokes of a wheel, making 8 even sections, and set the boule seam-side down in the center. Bring the strings up and tie each one at the top, snug but not cutting into the dough. You are making a loose cage, not strangling it: the dough will expand as it proofs and bakes, and the strings need room to give. Trim the ends, flip the loaf into a floured banneton or a bowl lined with a floured towel, strings and all.
4. Cold proof (8–16 hours)
Cover and refrigerate. Cold dough plus strings equals clean ridges. Do not skip the fridge step for this loaf; a room-temperature proof spreads before the strings can do their work.
5. Bake
Heat the oven with the Dutch oven inside to 245°C (475°F) for 45 minutes. Turn the cold loaf out onto parchment, score a small shallow X or a simple leaf pattern in each section if you like (keep scores shallow; deep cuts blur the ridges), and lower it in.
Bake 20 minutes with the lid on. Remove the lid, drop the heat to 220°C (430°F), and bake 20–25 minutes more until the crust is a deep golden brown. Pumpkin crusts color fast because of the sugars, so judge doneness by temperature, not just color: the center should read 96–98°C (205–208°F). If the top is darkening too quickly in the last 10 minutes, tent loosely with foil.
6. The reveal
Cool at least 2 hours. Cutting early gives a gummy crumb, and pumpkin crumb is gummy-prone to begin with. When the loaf is fully cool, snip the strings at the top and peel them away gently. Press a cinnamon stick or a pecan half into the center as the stem. Done. Photograph it before anyone cuts it. You have about 30 seconds.
Troubleshooting
My loaf spread and the ridges disappeared. Three usual causes: the strings were tied too loosely, the dough was over-proofed, or the cold proof was skipped. Next time, tie snug (not tight), pull the bulk ferment 30 minutes earlier, and keep the fridge step.
The sections are uneven. The dough wasn’t centered on the twine cross, or the strings weren’t spaced evenly. Take ten seconds to eyeball the spacing before you tie. It is the cheapest fix in this whole recipe.
The strings baked into the crust. They weren’t oiled, or they were tied tight enough to cut in as the loaf expanded. Oil them well and leave a finger’s width of give.
The crumb is gummy. Cut too early, or underbaked. Pumpkin crumb needs the full cool-down, and the internal temperature check matters more than the color.
The bottom is too dark. The puree’s sugars again. Put a baking sheet on the rack below the Dutch oven for the second half of the bake.
Variations worth trying
- Seeded top: skip the twine, brush with water, and press on pumpkin seeds before baking. Same dough, market-bakery look.
- Mini pumpkins: divide the dough into 4 small boules (about 250 g each) and tie each one. Bake 15 minutes lid on, 15 off. These are the ones that disappear at parties.
- Savory version: drop the maple and cinnamon, add 1 teaspoon of finely chopped rosemary to the dough. Serve with soup.
Storage
Keeps 2 days in a cloth bag at room temperature; the crumb stays soft longer than a plain loaf because of the puree. It freezes well sliced: toast from frozen. Do not refrigerate the baked loaf, it stales faster.
FAQ
Can I use homemade pumpkin puree? Yes, but it is usually wetter than canned. Strain it in a sieve for 30 minutes first, or hold back 25 g of the water and add it only if the dough feels dry after mixing.
Can I use discard instead of active starter? Not for the rise. Discard won’t lift this dough on its own. If your starter is sluggish, feed it twice before baking day rather than reaching for the discard jar.
Do I need a Dutch oven? It helps the shape hold, because the walls support the loaf early in the bake. Without one, bake on a preheated stone or heavy sheet pan with a tray of boiling water on the lower rack for the first 20 minutes, and tie the strings a fraction snugger.
Does it taste like pumpkin? Gently. Soft, golden, faintly sweet, with the cinnamon there if you add it. Think of it as a sourdough that dressed up for fall, not a dessert bread.
New to sourdough? Start with our starter guide in the Sourdough section, then come back for this one. If your loaf goes wrong in a way this page doesn’t cover, the Troubleshooting section was built for exactly that.